はじめに
この記事では、モバイルアプリ用のフレームワークであるFlutterのインストール方法をまとめます。Flutterについて知りたい方は、以下の記事を事前にご覧ください。

前提条件
今回Flutterをインストールするのは、以下の環境になります。
Ubuntu 24.04 LTS
インストール手順
まず、Flutterのインストールに必要な依存関係をインストールします。端末を開き、以下のコマンドを実行してください。
sudo apt update
sudo apt install -y curl git xz-utils zip libglu1-mesaFlutter SDKをダウンロードします。任意のディレクトリに、以下のコマンドで最新のFlutter SDKを取得します。
git clone https://github.com/flutter/flutter.gitまず、以下のコマンドでflutterをインストールしたパスを確認します。
pwd以下のコマンドで環境変数にパスを登録
export PATH="$PATH:<pwdで確認したパス>/flutter/bin"パスを保存しておくために、bashrcに登録します。
vim ~/.bashrc
(bashrcに export PATH="$PATH:<pwdで確認したパス>/flutter/bin" を追記してください。)
source ~/.bashrc以下のコマンドでFlutterの依存関係のインストールと設定を確認できます。
flutter doctor私の環境では以下のようにいくつかのパッケージが足りないというメッセージが出ました。
Doctor summary (to see all details, run flutter doctor -v):
[✓] Flutter (Channel master, 3.23.0-13.0.pre.168, on Ubuntu 24.04 LTS 6.8.0-31-generic, locale ja_JP.UTF-8)
[✗] Android toolchain - develop for Android devices
    ✗ Unable to locate Android SDK.
      Install Android Studio from: https://developer.android.com/studio/index.html
      On first launch it will assist you in installing the Android SDK components.
      (or visit https://flutter.dev/docs/get-started/install/linux#android-setup for detailed instructions).
      If the Android SDK has been installed to a custom location, please use
      `flutter config --android-sdk` to update to that location.

[✗] Chrome - develop for the web (Cannot find Chrome executable at google-chrome)
    ! Cannot find Chrome. Try setting CHROME_EXECUTABLE to a Chrome executable.
[✗] Linux toolchain - develop for Linux desktop
    ✗ clang++ is required for Linux development.
      It is likely available from your distribution (e.g.: apt install clang), or can be downloaded from https://releases.llvm.org/
    ✗ ninja is required for Linux development.
      It is likely available from your distribution (e.g.: apt install ninja-build), or can be downloaded from https://github.com/ninja-build/ninja/releases
    ✗ pkg-config is required for Linux development.
      It is likely available from your distribution (e.g.: apt install pkg-config), or can be downloaded from https://www.freedesktop.org/wiki/Software/pkg-config/
[!] Android Studio (not installed)
[✓] Connected device (1 available)
[✓] Network resources上のメッセージだと以下のパッケージが足りないようなので、それぞれインストールします。
- Android SDK
- Chrome
- Linux toolchain(clang++、ninja、pkg-config)
Android SDK
Android Studioをインストールし、SDKを設定します。
Android Studioのダウンロードページから、最新のAndroid Studioをダウンロードします。今回はUbuntu環境なので、以下のリンクをクリックします。
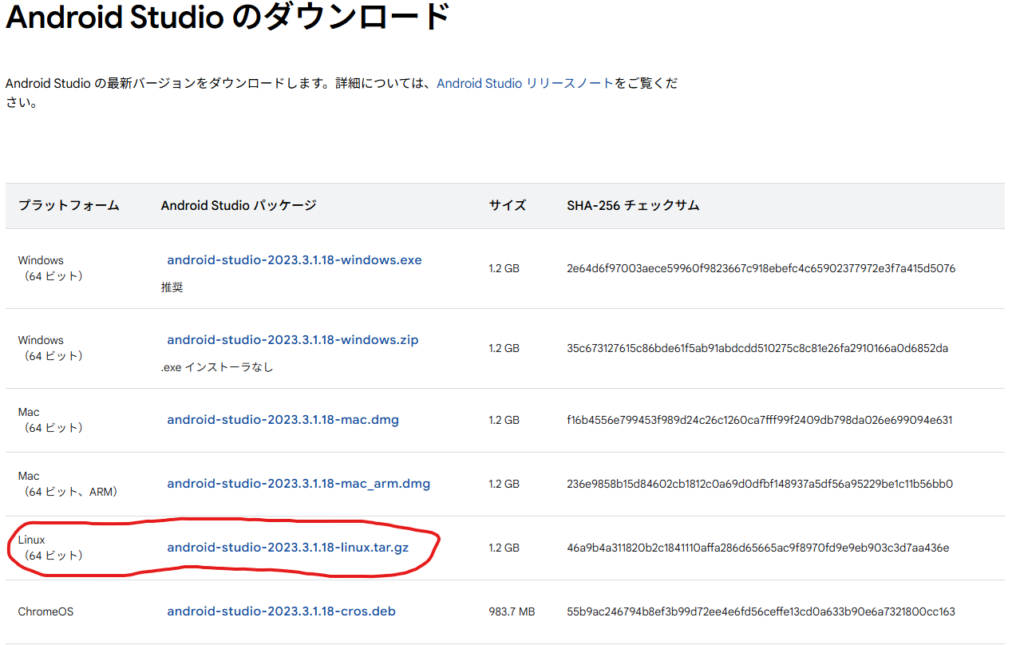
ダウンロードしたファイルを解凍し、適当なディレクトリに配置します。
sudo tar -xzf android-studio-*-linux.tar.gz -C <任意のディレクトリ>インストールディレクトリに移動し、Android Studioを起動します。(Ubuntu内のターミナルで実行してください。)
cd android-studio/bin/
./studio.sh
初回起動時に表示されるセットアップウィザードに従い、SDKのインストールと設定を行います。

進めていくとコンポーネントのダウンロードが始まります。

Android Studioを起動し、SDK Managerを開きます。「More Actions」→「SDK Manager」

設定画面が開くので、「SDK Tools」タブから「Android SDK Command-line Tools (latest)」にチェックを入れ、「Apply」を教えてください。

コンポーネントのインストールが開始します。終わったら「Finish」を押してください。

次に、以下のコマンドを実行して、ライセンスの承認を行ってください。
flutter doctor --android-licensesChrome
ChromeのダウンロードページからUbuntu用のChromeをダウンロードしてください。
以下のコマンドでインストールします。
sudo apt install ./google-chrome-stable_current_amd64.debLinux toolchain
以下のコマンドで足りないパッケージをインストールしてください。
sudo apt install clang
sudo apt install ninja-build
sudo apt install pkg-config
sudo apt install libgtk-3-devここまでの手順が完了したら、再度、以下のコマンドでFlutterの依存関係の設定を確認してください。
flutter doctor以下のように全てチェックになっていればFlutterのインストールと設定は完了です。
Doctor summary (to see all details, run flutter doctor -v):
[✓] Flutter (Channel master, 3.23.0-13.0.pre.168, on Ubuntu 24.04 LTS 6.8.0-35-generic, locale ja_JP.UTF-8)
[✓] Android toolchain - develop for Android devices (Android SDK version 34.0.0)
[✓] Chrome - develop for the web
[✓] Linux toolchain - develop for Linux desktop
[✓] Android Studio (version 2023.3)
[✓] Connected device (2 available)
[✓] Network resources
さいごに
今回はFlutterのインストール手順についてまとめてみました。次回は実際にFlutterで簡単なアプリケーションを作成してみます。
