はじめに
この記事では、モバイルアプリ用のフレームワークであるFlutterを使って、簡単なアプリケーションを作ってみます。
今回使用している環境はUbuntu 24.04 LTSです。
Flutterのインストールがまだの方は以下の記事をご覧ください。

新しいFlutterプロジェクトの作成
任意のディレクトリで以下のコマンドを実行し、新しいFlutterプロジェクトを作成します。
flutter create flutter_app以下のようなメッセージが表示されていればプロジェクトの作成は成功しています。
Creating project flutter_app...
Resolving dependencies in `flutter_app`...
Downloading packages...
Got dependencies in `flutter_app`.
Wrote 129 files.

All done!
You can find general documentation for Flutter at: https://docs.flutter.dev/
Detailed API documentation is available at: https://api.flutter.dev/
If you prefer video documentation, consider: https://www.youtube.com/c/flutterdev

In order to run your application, type:

  $ cd flutter_app
  $ flutter run

Your application code is in flutter_app/lib/main.dart.
作成したプロジェクトディレクトリに移動します。
cd flutter_app/アプリケーションの作成
lib/main.dartファイルを開き、以下のように編集します。これはシンプルなカウンターアプリの例です
import 'package:flutter/material.dart';

void main() {
  runApp(MyApp());
}

class MyApp extends StatelessWidget {
  @override
  Widget build(BuildContext context) {
    return MaterialApp(
      title: 'Flutter Demo',
      theme: ThemeData(
        primarySwatch: Colors.blue,
      ),
      home: MyHomePage(title: 'Flutter Demo Home Page'),
    );
  }
}

class MyHomePage extends StatefulWidget {
  MyHomePage({Key? key, required this.title}) : super(key: key);

  final String title;

  @override
  _MyHomePageState createState() => _MyHomePageState();
}

class _MyHomePageState extends State<MyHomePage> {
  int _counter = 0;

  void _incrementCounter() {
    setState(() {
      _counter++;
    });
  }

  @override
  Widget build(BuildContext context) {
    return Scaffold(
      appBar: AppBar(
        title: Text(widget.title),
      ),
      body: Center(
        child: Column(
          mainAxisAlignment: MainAxisAlignment.center,
          children: <Widget>[
            Text(
              'You have pushed the button this many times:',
            ),
            Text(
              '$_counter',
              style: Theme.of(context).textTheme.headlineMedium,
            ),
          ],
        ),
      ),
      floatingActionButton: FloatingActionButton(
        onPressed: _incrementCounter,
        tooltip: 'Increment',
        child: Icon(Icons.add),
      ),
    );
  }
}
メイン関数
void main() {
  runApp(MyApp());
}main関数は、Dartアプリケーションのエントリーポイントです。この関数では、runApp関数を呼び出してMyAppウィジェットをアプリケーションのルートとして設定しています。
MyAppクラス
class MyApp extends StatelessWidget {
  @override
  Widget build(BuildContext context) {
    return MaterialApp(
      title: 'Flutter Demo',
      theme: ThemeData(
        primarySwatch: Colors.blue,
      ),
      home: MyHomePage(title: 'Flutter Demo Home Page'),
    );
  }
}MyAppクラスは、StatelessWidgetを継承しています。StatelessWidgetは状態を持たないウィジェットで、一度作成された後は再構築されません。
buildメソッドは、ウィジェットツリーを構築します。この場合、MaterialAppウィジェットを返し、そのプロパティとしてtitle、theme、homeを設定しています。
title:アプリのタイトルtheme:アプリのテーマhome:アプリのホーム画面(今回はMyHomePageウィジェットがホーム画面です。)
MyHomePageクラス
class MyHomePage extends StatefulWidget {
  MyHomePage({Key? key, required this.title}) : super(key: key);

  final String title;

  @override
  _MyHomePageState createState() => _MyHomePageState();
}MyHomePageクラスは、StatefulWidgetを継承しています。StatefulWidgetは状態を持つウィジェットで、状態が変更されるたびに再構築されます。
コンストラクタで、ホームページのタイトルを受け取り、createStateメソッドでは、このウィジェットに関連付けられた状態オブジェクトを作成します。この場合、_MyHomePageStateオブジェクトを作成します。
_MyHomePageStateクラス
_MyHomePageStateクラスは、MyHomePageの状態を管理します。このクラスはState<MyHomePage>を継承しています。
class _MyHomePageState extends State<MyHomePage> {
  int _counter = 0;

  void _incrementCounter() {
    setState(() {
      _counter++;
    });
}_counterは、ボタンが押された回数を記録する整数型の変数です。
_incrementCounterメソッドは、カウンターをインクリメントし、setStateを呼び出してUIを更新します。
@override
Widget build(BuildContext context) {
  return Scaffold(
    appBar: AppBar(
      title: Text(widget.title),
    ),
    body: Center(
      child: Column(
        mainAxisAlignment: MainAxisAlignment.center,
        children: <Widget>[
          Text(
            'You have pushed the button this many times:',
          ),
          Text(
            '$_counter',
            style: Theme.of(context).textTheme.headlineMedium,
          ),
        ],
      ),
    ),
    floatingActionButton: FloatingActionButton(
      onPressed: _incrementCounter,
      tooltip: 'Increment',
      child: Icon(Icons.add),
    ),
  );
}buildメソッドは、UIを構築します。
Scaffoldウィジェットは、基本的なマテリアルデザインのレイアウト構造を提供します。
appBarはアプリバーを設定します。ここでは、アプリバーのタイトルとしてwidget.titleを表示しています。
bodyは、画面の主要部分を設定します。ここでは、中央に配置されたColumnウィジェットを使用して、2つのTextウィジェットを表示しています。1つは固定のテキスト、もう1つはカウンターの値です。
floatingActionButtonは、画面の右下に表示されるボタンです。このボタンを押すと_incrementCounterメソッドが呼び出され、カウンターが増加します。
実行結果
以下のコマンドで作成したアプリケーションを実行します。
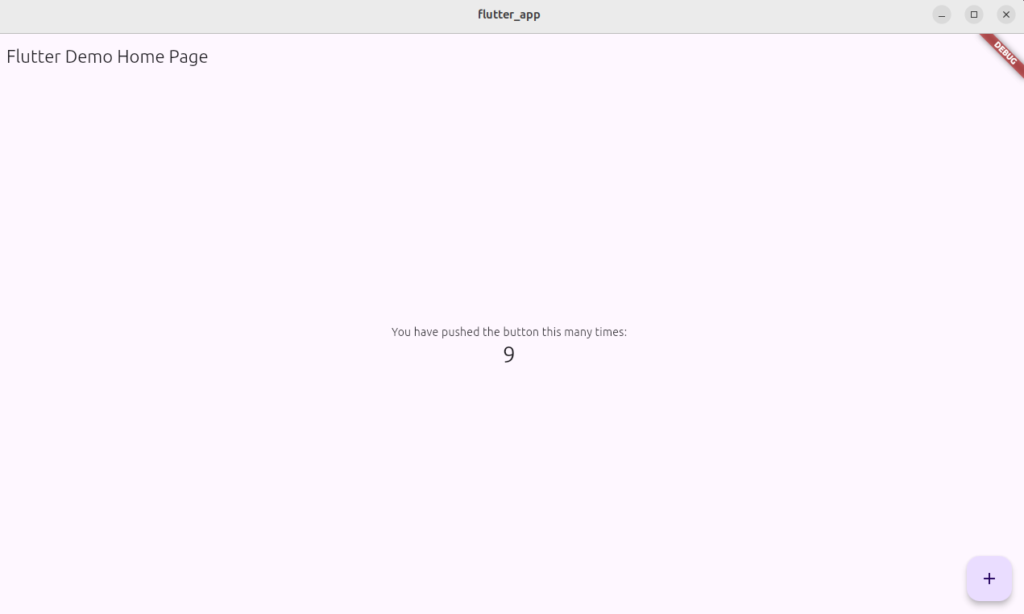
flutter run以下のウィンドウが立ち上がります。
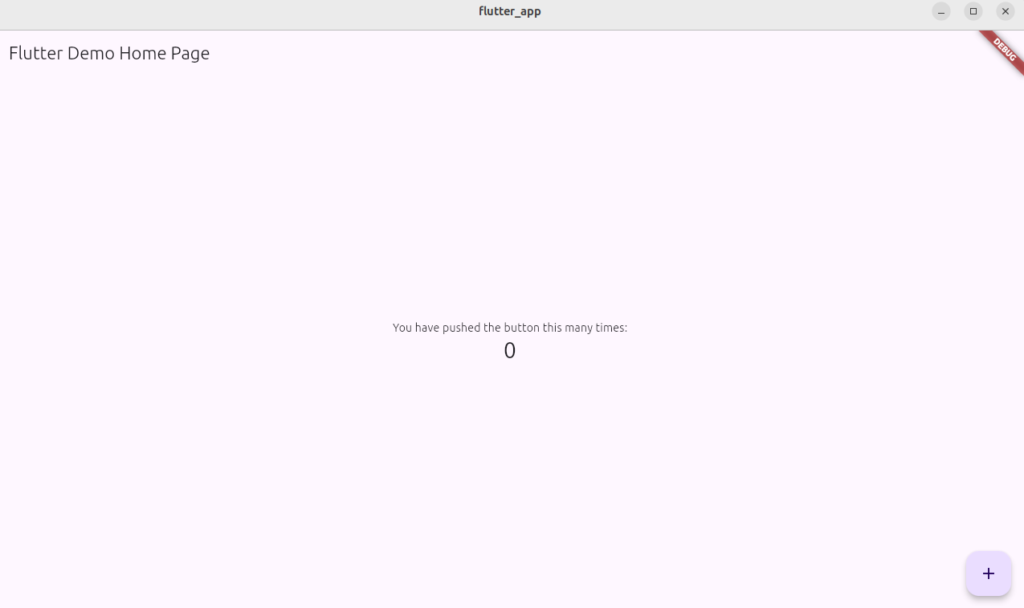
右下の「+」ボタンを押すとカウンタがインクリメントされます。
